

 As the seasons turn, I have to admit that my favourite seasons are Autumn and Winter. The colours, the scents, the change in food and I am a big fan of keeping alive family traditions.
I brought this little Angel quite a while ago and she stays up all year round, in December she is a Christmas decoration and the rest of the time she is a folk decoration!
Last year I put up a wreath made of dried fruit slices, once the slices had gone past their best I decided to keep the wreath frame to see if I could put it to good use and this is what I came up with……
Materials Required

2 Sheets of felt in your main colour
1 Sheet of felt in a contrasting colour
Wreath Frame and hanging loop.
Cardboard Leaf Template in 3 sizes/styles
Fabric Pen/Tailors chalk
Scissors and Pva/Fabric Glue
Needle and Contrasting Thread/Decorative button
I am not too specific with the fabrics and what colours you should use, because I think that hand made items should be unique and this wreath could be Autumnal, Spring like or just matching the decor of your room.
First thing, draw your leaf templates (I used the back of an old cereal packet to make mine) and cut them out. The largest size leaf to cover the wreath frame measured 6.5cm in length and 3.5cm at the widest part of the curve, the smaller one is 4.5cm by 2.3cm and the long thin ones measured 6cm by 2cm.
Draw round your largest leaf template first, I cut out and used 25 large leaves. Next I cut out the tabs that will hold the leaves onto the wreath, the tabs measure approx 2.5cm in length by 1cm in width. As I used some left over bits of fabric between the leaf cut outs the tabs are not all exactly the same so don’t worry about making sure that they are ruler perfect.


After you have cut all of the large leaves, place the leaves under the wreath frame a few at a time. Place them with a slight overlap and lie them in slightly different ways. Get your glue and put a bit over the middle of the leaf, the same length and width as the tab. As I was using PVA I put some glue on both pieces and waited for it to go slightly tacky before gluing the pieces together. I also put a small dab of glue in between the overlap of the leaves to hold them in place.
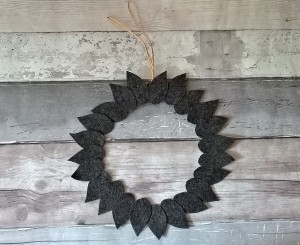
After you have finished gluing all the tabs on the leaves and everything is dry, this is what you will end up with. All the leaves need to overlap and no wire should be seen.
I let this layer of leaves dry overnight with a book on top as I was using PVA glue but it might not be necessary with fabric glue or a tackier glue.

Next cut out your slightly smaller leaves, I used 11 of the small grey leaves. To give the leaves a bit of texture and contrast to the background, I embroidered them with Fern stitch.
The red thread that I used is Guttermans extra strong thread and I started sewing at the tip of the leaf and worked my way towards the base.

Once the small leaves have been glued on, cut out and layer on your contrasting leaves. I decided at this point that I wanted a flower at the top.
I cut out two six petal flowers and layered them for a Poinsettia effect then stitched the button in the middle. You could use anything to decorate for a bit of sparkle or a different look.
Glue your last pieces on including the decoration and leave to dry before hanging. Find a place for your wreath and enjoy!

