Hand Sewing · Upcycling

Circular Motions – Wreath Making

wp_20161014_16_02_24_proAs the seasons turn, I have to admit that my favourite seasons are Autumn and Winter. The colours, the scents, the change in food and I am a big fan of keeping alive family traditions.

I brought this little Angel quite a while ago and she stays up all year round, in December she is a Christmas decoration and the rest of the time she is a folk decoration!

Last year  I put up a wreath made of dried fruit slices, once the slices had gone past their best I decided to keep the wreath frame to see if I could put it to good use and this is what I came up with……

Materials Required

wp_20161011_17_09_24_pro

2 Sheets of felt in your main colour

1 Sheet of felt in a contrasting colour

Wreath Frame and hanging loop.

Cardboard Leaf Template in 3 sizes/styles

Fabric Pen/Tailors chalk

Scissors and Pva/Fabric Glue

Needle and Contrasting Thread/Decorative button

I am not too specific with the fabrics and what colours you should use, because I think that hand made items should be unique and this wreath could be Autumnal, Spring like or just matching the decor of your room.

First thing, draw your leaf templates (I used the back of an old cereal packet to make mine) and cut them out.  The largest size leaf to cover the wreath frame measured 6.5cm in length and 3.5cm at the widest part of the curve, the smaller one is 4.5cm by 2.3cm and the long thin ones measured 6cm by 2cm.

Draw round your largest leaf template first, I cut out and used 25 large leaves. Next I cut out the tabs that will hold the leaves onto the wreath, the tabs measure approx 2.5cm in length by 1cm in width. As I used some left over bits of fabric between the leaf cut outs the tabs are not all exactly the same so don’t worry about making sure that they are ruler perfect.

After you have cut all of the large leaves, place the leaves under the wreath frame a few at a time. Place them with a slight overlap and lie them in slightly different ways. Get your glue and put a bit over the middle of the leaf, the same length and width as the tab. As I was using PVA I put some glue on both pieces and waited for it to go slightly tacky before gluing the pieces together. I also put a small dab of glue in between the overlap of the leaves to hold them in place.
wp_20161012_14_06_30_pro

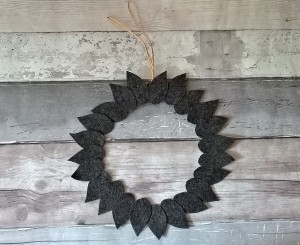
After you have finished gluing all the tabs on the leaves and everything is dry, this is what you will end up with. All the leaves need to overlap and no wire should be seen.

I let this layer of leaves dry overnight with a book on top as I was using PVA glue but it might not be necessary with fabric glue or a tackier glue.


wp_20161012_16_57_09_pro

Next cut out your slightly smaller leaves, I used 11 of the small grey leaves. To give the leaves a bit of texture and contrast to the background, I embroidered them with Fern stitch.

The red thread that I used is Guttermans extra strong thread and I started sewing at the tip of the leaf and worked my way towards the base.


wp_20161012_16_49_15_pro


Once the small leaves have been glued on, cut out and layer on your contrasting leaves. I decided at this point that I wanted a flower at the top.

I cut out two six petal flowers and layered them for a Poinsettia effect then stitched the button in the middle. You could use anything to decorate for a bit of sparkle or a different look.

Glue your last pieces on including the decoration and leave to dry before hanging.  Find a place for your wreath and enjoy!

wp_20161014_16_14_16_pro


Hand Sewing · Refashion · Upcycling

Autumn Influences – DIY Upcycled Wine Bottle Gift Bag

WP_20160830_14_37_27_ProOne of the first jobs I did after becoming self-employed was taking up some curtains for a friend. He had just moved into a cottage with low ceilings and quite a lot had to come off as the hems would’ve been too heavy left uncut.

I was given the left over fabric and have had it for a little while. I decided instead of giving him a birthday present in a normal paper bag I would make him one out of the off cuts and he could either use it again or use it as a decorative cover for a bottle at home. (He loved it & the contents!)

I love the colours, there is something subtly Scottish about it, the purples and greens are shades of the moors. I had some small pieces of chocolate-brown silk lining which I used to give it a great luxury feel!

With September upon us I fancied making another one and pimping it up with a bit of applique and hand embroidery. I have just started using Fern stitch on the swirls and later I will fill in the gaps with various flower designs.


Hand Sewing · Upcycling

Elysian Fields

Elysian relates to a heaven or paradise, I found these little fields of heaven in my local area next to the Skate Park!

I wanted to take a picture of these fantastic wild poppy areas for sometime but the weather has always been either raining or too windy. I am planning on using the photos  as inspiration for some floral impressionistic embroidery.

I experimented with an old bookmark I had made previously rather then use up some unused fabrics.


WP_20160719_13_46_48_Pro
Trudi Price 2016

I  managed to find some scraps left from old evening dresses that I had made sometime ago,the pink silk has the same vibrancy as the poppies. For the stems I used back stitch but did the back stitch on the wrong side so the stems look more natural and unkempt on the front.

I am pretty pleased with the results so I am going to have a go on some larger pieces of fabric.


All images are subject to copyright, if you wish to reuse an image please contact me first or credit me as part of the useage.

Hand Sewing · Upcycling

New Balls Please!

I had planned to put up a tutorial this week about a fabric cutlery holder I was making but I had one eye on Wimbledon and realised I was half way through before I had taken photos of the method used!

Well, I thought I would do a little post anyway and save the method for another time.

InstagramCapture_a8b0e7a2-f804-4445-9691-1da717930246After I made this bag for myself I had the pieces of fabric left over from the centre of the handles, they weren’t very wide but I like to keep a lot of even fairly small scraps as they can come in handy.

Also, I had been to a restaurant a while a go and kept the little paper holder for the knife and fork, thinking that I might find some use for it.


FB_20160708_17_10_30_Saved_PictureI came up with a little pattern to make my own version and I wanted the edge of the opening to be bound.  Even though I can sew pretty well, I really hate applying Bias binding so I decided to extend the edge of the lining and fold it down I did this first so the edges would be stitched underneath.

Also, I hand appliqued the small circles to the front before stitching all of the pieces together.

I used the bagging out method to stitch the pieces together, by trapping the front pocket pieces between the lining and the outer leaving a small unstitched gap to turn the whole piece through to the right side.

WP_20160706_21_03_20_ProI have made just the one here but if you are going to make e.g a set of two or more then run your sewing like a factory line, cut all the pieces out, stitch all the bindings down, sew the back and front halves together, sew round each holder, turn each one through, then stitch up the gap on each one.


Appropriately, I learned a lot about factory methods when I worked as a pattern cutting assistant for a small factory, which at the time made shorts for the Wimbledon ballboys/girls!

Excuse the different framing on the photos I had been messing around with a bit of editing on a phone app and realised that I had deleted my originals.


Hand Sewing · Upcycling

Pins and Needles – The Appliqued Needlecase.

Well, its been two months since I last wrote anything on my blog.  I have had a bit of blog apathy as sometimes I feel writing/uploading to a blog can be time consuming and I wanted to try out lots of  different ideas.

Recently, I decided that I needed to make myself a new needlecase. After I uploaded the picture to insta I thought that it might make a good tutorial – so here are the instructions. If you make one let me know and post a picture!

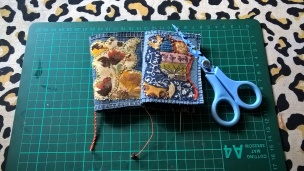
WP_20160615_12_50_53_ProThis is the look that we are going for, a denim cover with a blanket stitched edge and a layered applique front.

I use two different fabrics one Indian style and one is more country style, you will see that I wanted the front to reflect the inside.

Materials Required

Fabric scraps – largest size 14cm x 9cm

Iron on Interfacing

Strong Thread – such as top stitching thread/ Decorative threads.

A size 10 Crewel embroidery needle

Scissors/ Rotary Cutter/Awl/Cutting Mat

Ruler and Vanishing Pen

WP_20160614_12_55_12_Pro

Decide what you are going to use, I like to experiment with my husbands old denim jeans as I love the texture and fade of denim. I used leather on the inside as it doesn’t fray, my local scrapstore has a box full of leather in loads of colours. If you are going to use other fabrics for your inserts then the edges will need to be cut with Pinking Shears so they don’t fray. Any stitches that you don’t know how to do can easily be found by searching the net – I teach myself loads of new things this way!

First measure out your pieces for the cover and lining, I did mine at 14cm x 9cm. If you have a large print on your fabric then see if you can capture a good section before you cut, so you don’t have a lining with a random half flower on the inside!

WP_20160614_13_57_01_Pro

Cut out your interfacing so that it is the same size as the cover pieces. I have put the interfacing on both pieces of fabric as they are prone to fraying. Remember to iron them on the wrong side of the fabric!

Next, cut out the shapes you want to use on the front of your cover, you can stitch them on now and then cover the stitches with the lining. I did mine later on as I just caught the stitches through the denim. After that, pin the lining to the cover, wrong sides together and Blanket Stitch all the way round the edge.

Try and get your inserts to have a nice colour blend with your lining, or if you have bright colours go for a clash! Cut the inserts 2cm smaller all the way round. So, the largest one is 12cm x 7cm and the smallest one is 10cm x 5cm.

I punched the holes 0.5cm apart with the Awl on a cutting mat (mine is really old, you can use soft wood such as cork for a surface). Make sure the holes line up on both pieces of leather. Use your vanishing pen to make a mark on the fabric where the centre of the case is, make an anchoring stitch that will be hidden under the edge of the large piece of leather and start sewing the leather pieces to the outer case. Use Double running stitch and the Crewel Needle.

As you can see, I layered on my applique pieces after I blanket stitched the edge. This is so I knew it would fit into the space.  I attached the applique with a hand sewn Zig -Zag style stitch as the edge is quite fragile. In the photo on the right you can see the double running stitch down the spine of the needlecase.

I decided to attach a tail to the needlecase, I used a bit of retro crochet yarn I bought in a charity shop. I wove the yarn through the straight stitch down both sides, leaving a long end which I twisted up and anchored so the twist won’t undo itself. You can see in the photo below I used a single piece of yarn and finished it with a  bead at the bottom.

WP_20160615_12_50_53_Pro

That’s it!


Save

Save

Hand Sewing · Upcycling

Rags to Riches

In my personal, and I know, small bid to help stop the world drowning in landfill rubbish, here is the first step on my blog to show people how they can use things they might think are only good for the bin.

Phototastic-03_11_2015_7f0843b5-9c13-4700-ad57-e5944efcef67I made this heart decoration out of waste pieces of fabric left over from a pair of trousers that I altered for a friend of mine.

All of the pieces I had already in my craft box, from bits of broken jewellery and spare buttons, to some left over wadding from my trials with quilting.

Saving odd buttons and beads in a plastic box is a great way to have a little collection of decorative items that you can attach to anything you make, or items that you might want to customise.

The “how to” guide.

Phototastic-27_10_2015_6dac11b3-b021-466c-a1b1-d1d5bb178425Phototastic-27_10_2015_4402f5fa-f8ad-4095-abdf-545d76444326   Phototastic-27_10_2015_74dd2693-df57-4ced-b74f-7d4e2e4b711d

First, I cut the fabric open so that I was able to lay it flat. Next I used a cookie cutter to get the shape,this is a great way to make sure your shape is symmetrical. I placed the hearts as shown in the 3rd picture to minimise the amount of waste generated and to save the other piece for something else to make.

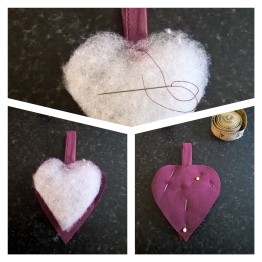
WP_20151027_11_22_48_ProHere, what I have shown is that I used the slightly smaller cookie cutter as a template for the wadding to go inside of the heart. The wadding is three layers thick.

Phototastic-03_11_2015_4b16c345-f87a-4aa8-b43f-019a4f62d6b3

I used the old hem edge of the jeans to make the loop for hanging, if you cut it close to the stitching the raw edge doesn’t fray.

The length I decided on was 12cm.

When deciding on length, you need to think about where you want to hang the item and the fact that about 1cm will be tucked into the decoration at either end of the loop.

You could also use ribbon and alternatives to wadding could be old tights with fabric inside such as t-shirt jersey because it is soft and flexible.

Phototastic-03_11_2015_2e9026ec-b5eb-4021-91e4-a72677f73c91The next steps are to fold the length for the loop in half, lift up a layer of the wadding, place the loop inside with 1cm in to stitch down, making sure you stitch through all of the layers. Sew a couple of straight stitches and sew over the stitches twice to add some strength.

Place one of the fabric hearts on your work surface with the right side (i.e the side that will be on the outside of the finished piece) of the fabric facing the table, put the wadding with the loop onto the the fabric and place it in the middle.

Place the 2nd heart on top of the wadding with the right side facing you, pin into place, making sure that the loop is in the centre of the indent of the heart.

Now you are ready to stitch your heart together and decorate it.

WP_20151102_10_32_10_ProWP_20151103_13_06_55_ProI have used Blanket Stitch to sew round the raw edge as it is both decorative and stops the edge from fraying.

Where the loop meets the top of the heart I used double running stitch, you will see in the finished picture that I hid this with bow at the top.

Eventually I plan to build a stitch library as part of my blog that will link to the italic writing, but for now  how to do these stitches can be found on the internet.

Come and visit me on a regular basis and I will see what other goodies I can cook up from odd bits of fabric, if you want to comment then put a link to your blog if you have any great bits of recycling involving fabric as well and I will come and visit  you!