Family History · Hand Sewing · sewing · Upcycling

Echoes of the Past

Creating memories in textiles.

This year marks 30 years since my father passed away, as the years have passed I never know how to feel about this. Once the raw grief passes there is longing and memories tinged with both warmth and sadness, I was 18 at the time of his passing and didn’t really know anyone else that had experienced this. At the time I just got on with life. I have spent many years not expressing the grief and lately as I know other friends that have lost parents and spouses too, I feel that I do not want to mention it as the initial loss is far more painful.

The book of secrets!

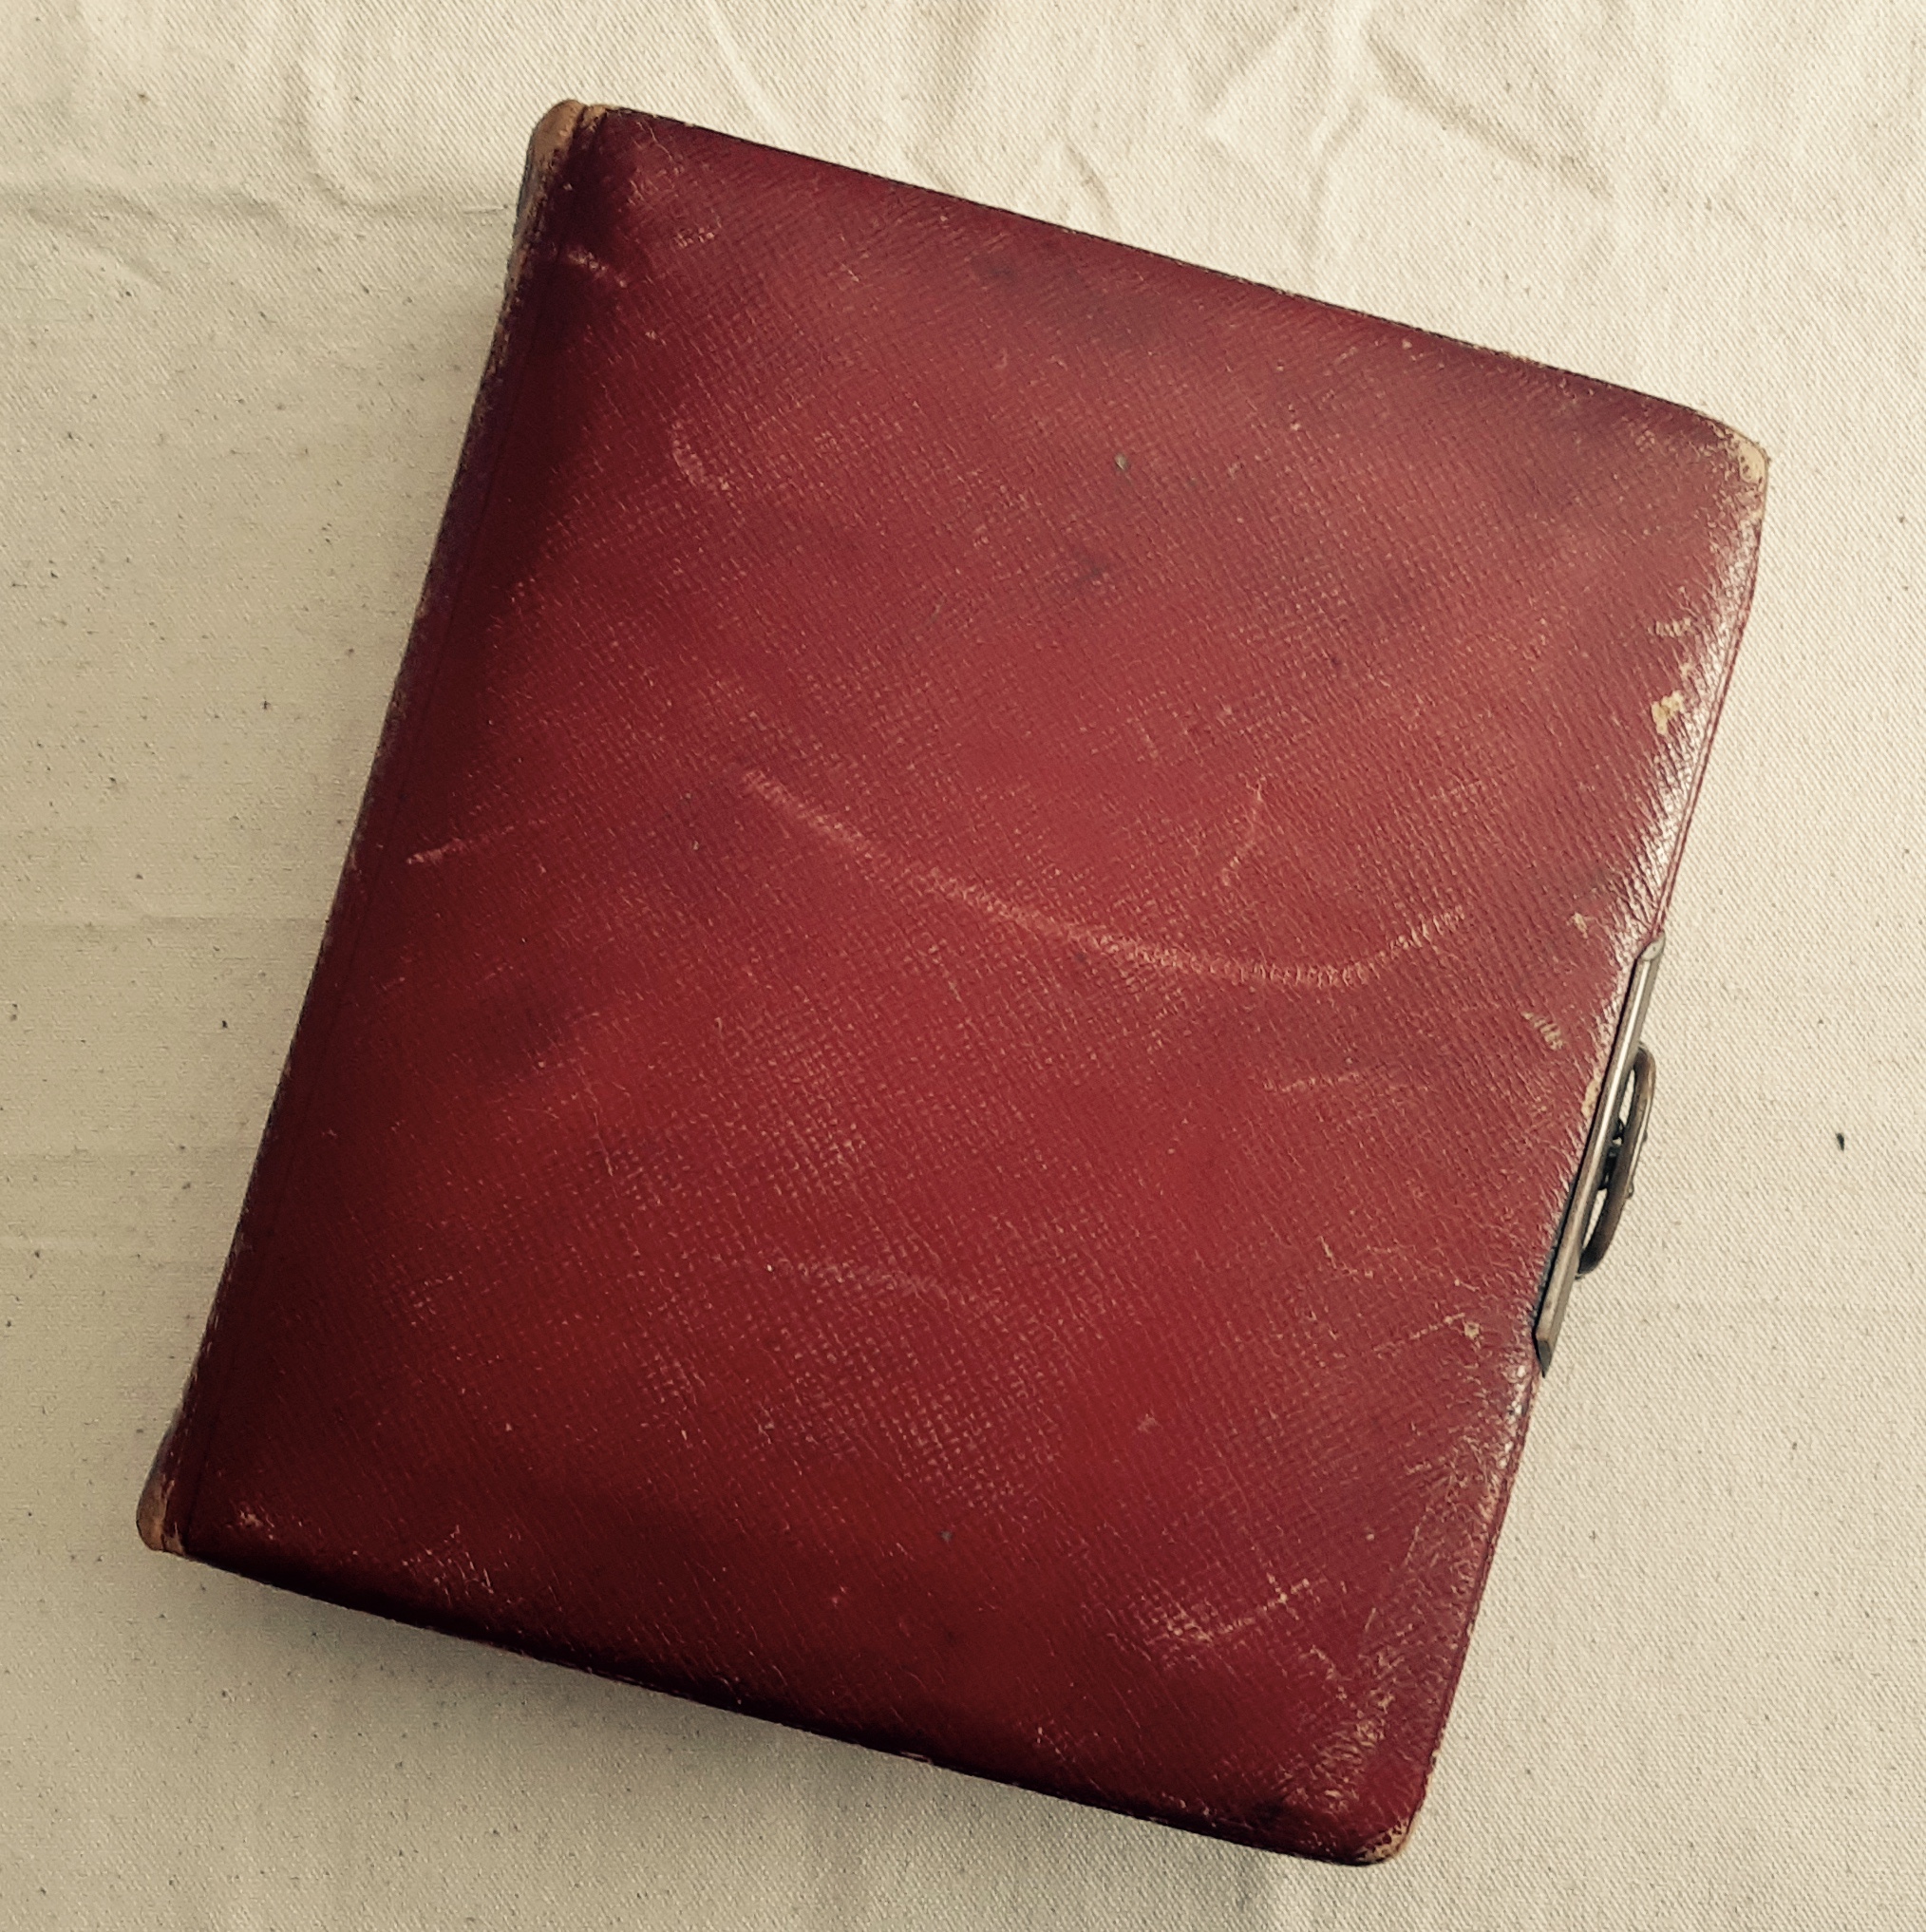
However, my husband lost both of his parents a couple of years before the pandemic started and with both of us being the children of older parents there is a rich unspoken history, on all sides of our family. My side of the family does not have lots of photos but I have always been facinated by costume and my husband’s side has lots of photos that go back to Edwardian times and probably a bit further. We were luckily enough to find them in this incredible leather bound photo album.

I have thought about what I would like to do with these photos to bring them alive a bit more and have thought about experimenting with image transfer, natural dyes and printing on cotton and canvas. Here is a small selection of images and my ideas of how this project is going to progress.

This is an idea for a mini moodboard, including a photo of my dad sitting at a writing desk in 1952. He was born in Poland of German and Polish descent, his Polish father was killed and he was conscripted up to the German Navy during the very last throes of war and some how he ended up over here.

I have heard various talk about being in a POW camp but also being part of barracks that were a Bomb disposal camp. According to google the german is translated as, ‘I will be leaving here soon’ but my main interest is his beautiful handwriting which I used to try and copy as a child.

Everything I learned about the countryside and nature was on walks with my dad. I would like to include these aspects on a textile piece based around the image above.

Celebrations and Tragedies

(Digging up a hidden history)

This photo is an historical mix of my husbands parents, his father is the baby pictured on the bottom row and with his parents on either side of the photo. On the top row is an RAF Padgate photo album we think my husbands father is pictured in, while on national service.

The postcard and photo on the left side of the top row, helped me to Identify that the nurse in the middle was a Military Matron in the first world war, and apparantly is decorated with an OBE, the Croix de Guerre and several other medals.

This untalked about family tragedy happened on my Mother-in-law’s side. Two little boys drowned in the River Severn in 1886, the sons of Ralph Mackay who painted Victorian Christmas card designs and other styles too, including the one pictured. One of the boys is on the right, identified by the writing on the back but I have yet to identify the other one. I believe all of the children are pictured but I try not to handle the photos too much.

These images are the mini moodboards for my project and I have been looking at several different textile art books and a book on fabric journals called Day Dreams Journals by Tilly Rose. I currently have it on loan from the library but I think I will have to make it part of my permanent collection, it is such a dreamy read!

Has anyone else used textiles as a way to bring their family history to life?

Hand Sewing · sewing · Upcycling

Something Borrowed….

One of my favourite things about sewing and textiles is that it is such a huge worldwide field and there are always so many new things to learn. There is such history wrapped up in cloth and sewing, it really is the tale of humans and culture with the added emotions of birth, death, migration, persecution, memories of clothing worn, comfort and so much more.

One of the skills I picked up was based on the traditional Japanese technique of Boro, this as with lots of cultural trends that come and go is steeped in history. A way of patching and repairing clothing to pass down to family members, these items of clothing or household textiles would have been repaired to last and essentially contained the story of the family through the textiles used.

Unlike now, where as a trend there is no history or emotion and items are sought after as a sign of expensive luxury. I still cannot understand the trend of buying jeans with identikit factory made rips in them already, any wear patches or mending should be a sign of how the clothing was worn.

Anyway, here are a few pics of the skills I picked up during the session, we were encouraged to be really creative and add other stitches and embroidery over the top. Since the session I have made several more of the squares and added other bits and pieces to them such as buttons and, I am really pleased to be able to say that all the fabrics are scraps I had already.

The largest photo is the stitching I did on the original session and the last one here at the bottom is the current piece I am stitching, it is based on a day trip that I took to Clevedon, near Bristol. I have decided that I would like to use the techniques to recall events and trips that I have taken, particularly in the natural landscape. It is instilling my emotions and memories into cloth and creating a visual diary for myself that is not on a hard drive.

Upcycling

Serging Ahead on Youtube

Throughout the pandemic I have really been kicking my own backside to get into having a better online presence and have been using my time to learn how to use online tools better. I decided to start a mini series on IGTV called craftbreak, the idea is that you can watch the crafts being made with a music background and no talking – sometimes unless I want to learn something specific I don’t feel that I need to hear people talking all of the time.

Get yourself a cup of tea, relax for a few minutes and watch how I upcycled this old glass jar (that someone was throwing away at my local allotment!) into a small feature lamp with battery powered fairy lights. If you enjoy it you could always go to my youtube channel and subscribe as I will be gradually posting more features up.

Refashion · sewing · Upcycling

Sewing a new Story

I was luckily enough to come across a large piece of this beautiful upholstery fabric by A.Sanderson. Upholstery fabrics are a great find as they are thicker and stronger then your average fabric.

After a bit of research it is a print from the 1980’s and was available in several colour ways. The print is incredible with swirling flowers and for me the subdued colour stops the fabric from being too chintzy.  As well as the name down the side, the edge states made in the United Kingdom – which maybe something we won’t have in the future so I think that makes the it special.

I guess being from the 80’s makes it vintage and that gives it a story, on my instagram account you can find a bag I made from a Suva fabric table cover, another piece of re-purposed fabric that nearly went to textile waste!

After much deliberation I decided to make a lovely shopper with a piece of the fabric and mix it with some re-purposed denim from old jeans.

I used denim for the lining and I decided to take one of the pockets off of the back of the jeans and put it on the front of the bag for a bit of contrast, I cut the piece of selvedge off that had made in the u.k printed on it and stitched in the bag – just for future nostalgia!

Phototastic-28_02_2017_88668d67-eb32-45fb-8641-202a7fa19714The bag has been one of my favourite makes, I made the handles using the “Time Was” fabric and added strength to them with 4 lines of stitching, take a look at the pic, no twin needles used here!

WP_20170316_15_31_06_Pro


Here is the finished item, I have used it every time I go into town for shopping and the amount of items I have carried back it, definitely make it a bag for life!InstagramCapture_827846e3-ab14-4216-8fd1-42c45fcc0e3a


Hand Sewing · Refashion · Upcycling

Autumn Influences – DIY Upcycled Wine Bottle Gift Bag

WP_20160830_14_37_27_ProOne of the first jobs I did after becoming self-employed was taking up some curtains for a friend. He had just moved into a cottage with low ceilings and quite a lot had to come off as the hems would’ve been too heavy left uncut.

I was given the left over fabric and have had it for a little while. I decided instead of giving him a birthday present in a normal paper bag I would make him one out of the off cuts and he could either use it again or use it as a decorative cover for a bottle at home. (He loved it & the contents!)

I love the colours, there is something subtly Scottish about it, the purples and greens are shades of the moors. I had some small pieces of chocolate-brown silk lining which I used to give it a great luxury feel!

With September upon us I fancied making another one and pimping it up with a bit of applique and hand embroidery. I have just started using Fern stitch on the swirls and later I will fill in the gaps with various flower designs.


Hand Sewing · Refashion · Upcycling

All made up and ready to go!

This week I have made myself a new make up bag that I will be taking on a little trip with me in September. Suitably for a re-made item I will be visiting The Festival of Thrift in Yorkshire.

I love the little change pockets in jeans and I wanted to use the pocket in situ, rather then removing it and putting it something else. So, I unpicked the waistband of the jeans in order to use the whole section easily.

WP_20160809_10_53_46_Pro

MATERIALS REQUIRED

An old pair of Jeans

Lining Material to fit

Zip of suitable length

Extra Strong Thread, a Hand Needle

Pins, Scissors, an Unpicker

A Ruler and Fabric Pen

A Chopstick or suitable poker for the corners!

First, I unpicked the waistband off the top of the jeans – keep this it could make a great bag handle, a fabric bracelet etc. Open up the outside leg seam of the jeans, you could open up the inside as well but it depends on what you else you think you will be making as you might want the fabric width.

When cutting out, cut the front pocket side of the jeans as close as possible to the fly opening and measure up and cut yourself a rectangle, think about the width of the bag ( add on seam allowances, I used 1cm and 1.5cm on the zip) and the size of zip you want to use but you can shorten a longer zip if required. I used an 8″ Zip.

Cut a matching size rectangle for the back and 2 more the same out of your lining fabric. It doesn’t matter if you cut through the pocket bag when making your rectangle on the front piece as you will trap the open edge in the seam later on.

Position the zip between the Denim and lining pieces. Pin one side of the zip in between the topside of the front denim piece (with the pocket) and a piece of the lining with the right sides facing, the right sides should also be covering the zip. Repeat with the other two pieces. You can check that the pieces are correctly pinned before sewing as when you turn them over the zip will be in the middle as seen above.

WP_20160809_10_55_03_Pro

To insert the zip, open out the fabric as seen on the left and stitch along the seam allowance. Make sure that you are not too close to the teeth or the lining will become trapped when you open and close the zip.

Start with the zip closed and as you get closer to the end open the zip so that you can keep the line straight. Repeat on the other side of the zip.

The Zip can be inserted with machine stitching but I  hand stitched the whole thing as essentially I don’t thread up my sewing machine unless I have a good couple of metres of sewing to do or a large project – and I really enjoy hand stitching as I can do it outside in nice weather!

WP_20160810_15_34_29_Pro

Next, open up the bag pieces as shown with the denim on one side and the lining on the other.

Start with the denim piece, lightly pin together ensuring that the bottom edge of the open pocket bag is pinned and will be stitched into the seam if you had cut through it as mentioned earlier. Sew all the way round the denim piece

Next, pin the lining pieces together.This time sew down from the edges and leave a gap in the middle to turn the bag through later on.

As I didn’t overlock my edges I lightly trimmed my seams on both pieces with a pair of pinking shears to stop fraying. Then, I pressed the seams open.

WP_20160810_15_58_26_Pro

After that, turn the bag to the right side through the gap left in the lining. Use your chopstick to carefully poke the corners out.

Fold the raw edges of the lining to the wrong side, so they line up with the seam and stitch the opening shut. I used slip stitch for this.

I hand top stitched the lining and denim together  with running stitch, which traps the seam allowance inside and helps the zip to run smoothly without catching.

WP_20160815_18_49_08_Pro

I used a faded old cotton pillowcase to make my lining from, as the bag is quite small you might see this fabric again in another project!

The Zip I used was quite chunky so I inserted a tab at the point where I stitched the lining and outer sides together. I left a small gap at the end of the zip and poked the tab through so the loop was on the outside and the raw edges were trapped on the inside.

WP_20160815_18_46_37_Pro

READY TO GO!


Hand Sewing · Upcycling

Elysian Fields

Elysian relates to a heaven or paradise, I found these little fields of heaven in my local area next to the Skate Park!

I wanted to take a picture of these fantastic wild poppy areas for sometime but the weather has always been either raining or too windy. I am planning on using the photos  as inspiration for some floral impressionistic embroidery.

I experimented with an old bookmark I had made previously rather then use up some unused fabrics.


WP_20160719_13_46_48_Pro
Trudi Price 2016

I  managed to find some scraps left from old evening dresses that I had made sometime ago,the pink silk has the same vibrancy as the poppies. For the stems I used back stitch but did the back stitch on the wrong side so the stems look more natural and unkempt on the front.

I am pretty pleased with the results so I am going to have a go on some larger pieces of fabric.


All images are subject to copyright, if you wish to reuse an image please contact me first or credit me as part of the useage.

Hand Sewing · Upcycling

New Balls Please!

I had planned to put up a tutorial this week about a fabric cutlery holder I was making but I had one eye on Wimbledon and realised I was half way through before I had taken photos of the method used!

Well, I thought I would do a little post anyway and save the method for another time.

InstagramCapture_a8b0e7a2-f804-4445-9691-1da717930246
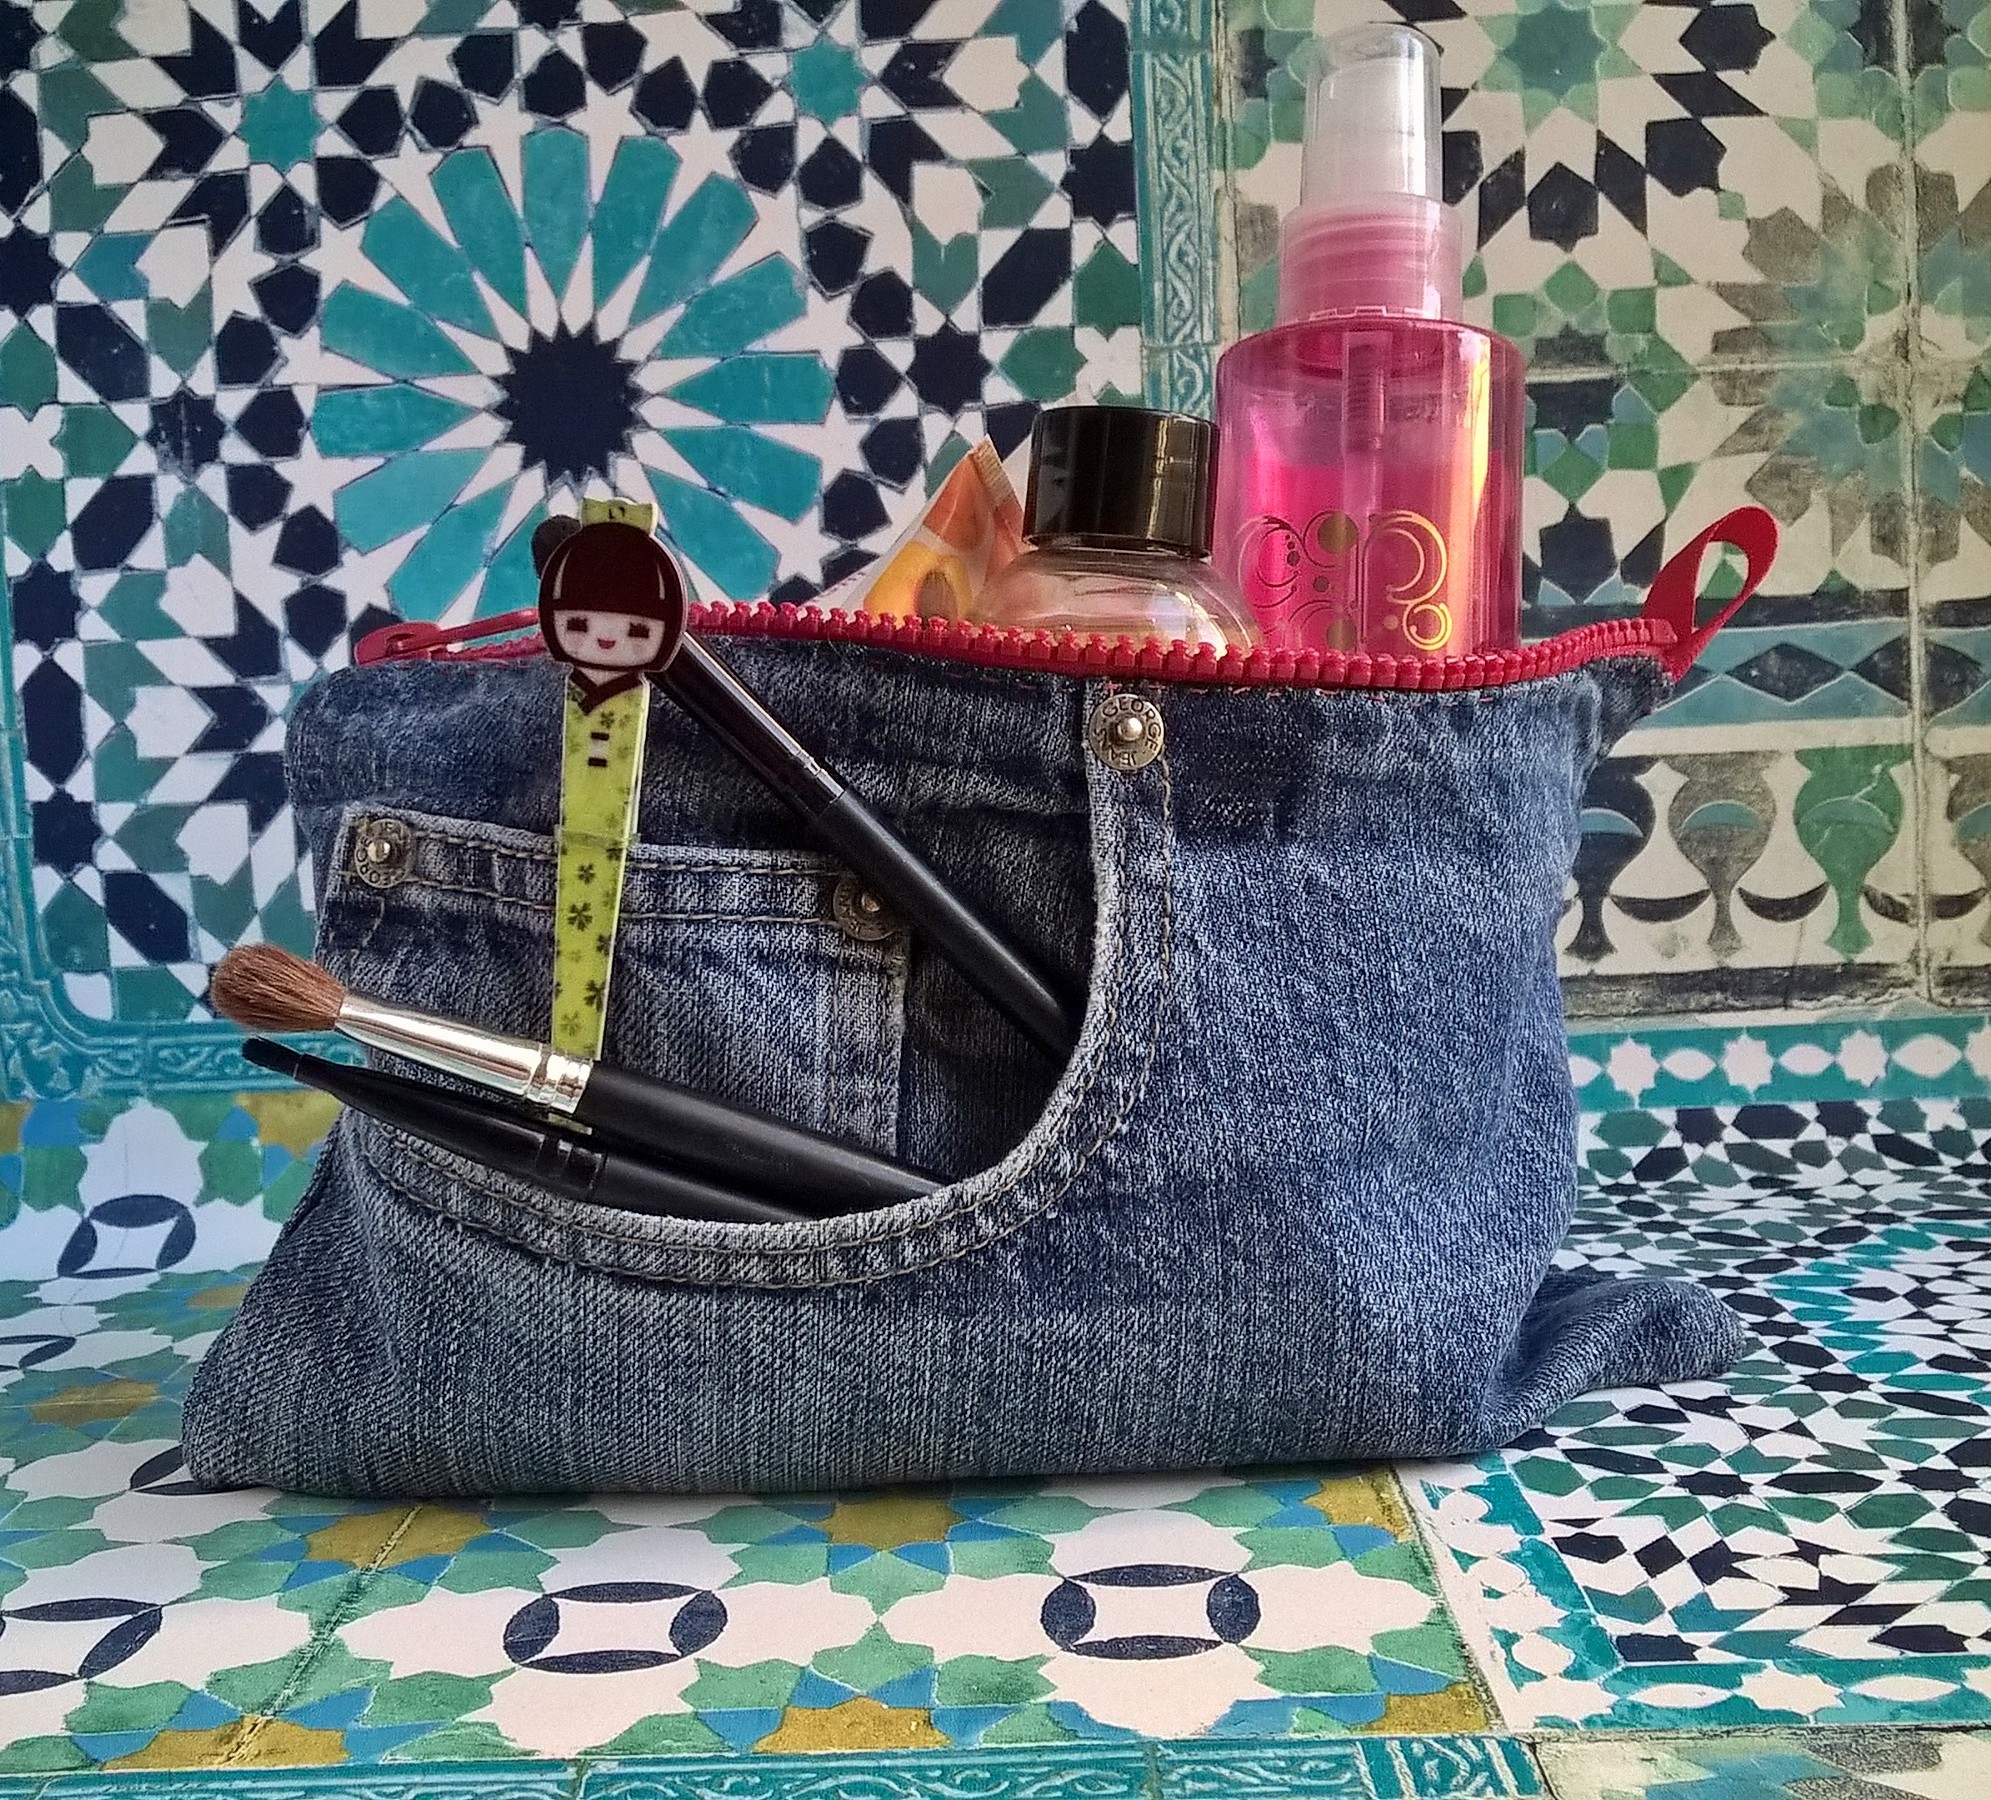
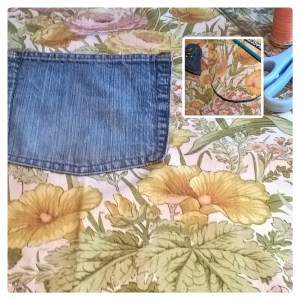
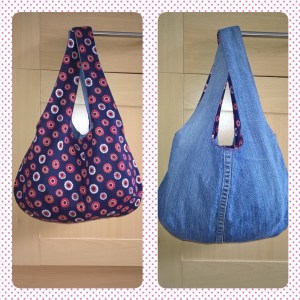
After I made this bag for myself I had the pieces of fabric left over from the centre of the handles, they weren’t very wide but I like to keep a lot of even fairly small scraps as they can come in handy.

Also, I had been to a restaurant a while a go and kept the little paper holder for the knife and fork, thinking that I might find some use for it.


FB_20160708_17_10_30_Saved_Picture
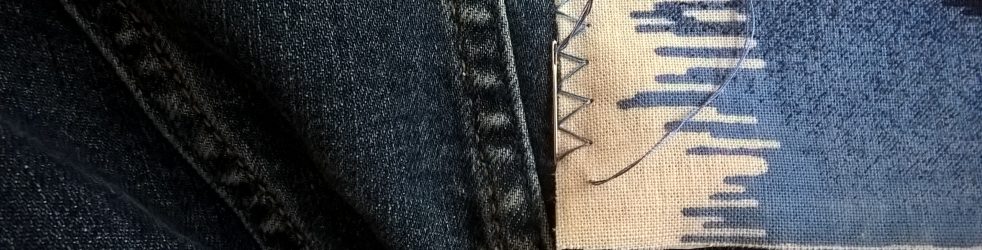
I came up with a little pattern to make my own version and I wanted the edge of the opening to be bound.  Even though I can sew pretty well, I really hate applying Bias binding so I decided to extend the edge of the lining and fold it down I did this first so the edges would be stitched underneath.

Also, I hand appliqued the small circles to the front before stitching all of the pieces together.

I used the bagging out method to stitch the pieces together, by trapping the front pocket pieces between the lining and the outer leaving a small unstitched gap to turn the whole piece through to the right side.

WP_20160706_21_03_20_ProI have made just the one here but if you are going to make e.g a set of two or more then run your sewing like a factory line, cut all the pieces out, stitch all the bindings down, sew the back and front halves together, sew round each holder, turn each one through, then stitch up the gap on each one.


Appropriately, I learned a lot about factory methods when I worked as a pattern cutting assistant for a small factory, which at the time made shorts for the Wimbledon ballboys/girls!

Excuse the different framing on the photos I had been messing around with a bit of editing on a phone app and realised that I had deleted my originals.


Festival Fashion · Hand Sewing · Upcycling

Thrifty Festival Accessories

For several years now festivals have become quite a big pull for people all over the world.  We probably have one of the most famous ones here in England, the Glastonbury Festival.

I went to Phototastic-24_06_2016_7ff305bb-792d-47cf-bcd4-0331b37769daHow The Light Gets In Festival in May, it was rain free! I went to Glastonbury last year for 5 days and got away with one heavy shower of rain! Pretty Lucky huh?

The popularity of festivals has kept an indie bohemian style to the forefront of summer fashion.

As I seem to have a box full of earthy colour scraps and beads, I thought I would put together a few funky tassels and accessories that are festival inspired.

There are loads of tutorials on Pinterest, so instead of putting together a tutorial I have put together a short list of the ones that inspired me.

http://missrenaissance.com/2013/04/01/6697/  – Tassel Inspiration

http://rachaelgreenland.co.uk/felt-balls-tutorial-update/ – A Felt Ball tutorial, its a great tutorial with really loud garden birds in the background!

http://howtodosomething.blogspot.co.uk/2010/01/how-to-make-feather-earrings.html – These earrings inspired the feather necklace pendants.

I like picking up seashells that have become worn and almost skeletal, the shells have natural holes that make threading easy, like the one on the orange thread tassel.

Apart from the roving I bought to try out the felt balls, I didn’t particulary use any specialist tools. The keyring parts are from broken old ones, the beads from old necklaces, I used an awl to make the holes in the leather but they are easily available from DIY stores.

Have a go, if you haven’t got any leather you can get some great effects in other fabrics.

Hand Sewing · Upcycling

Pins and Needles – The Appliqued Needlecase.

Well, its been two months since I last wrote anything on my blog.  I have had a bit of blog apathy as sometimes I feel writing/uploading to a blog can be time consuming and I wanted to try out lots of  different ideas.

Recently, I decided that I needed to make myself a new needlecase. After I uploaded the picture to insta I thought that it might make a good tutorial – so here are the instructions. If you make one let me know and post a picture!

WP_20160615_12_50_53_Pro
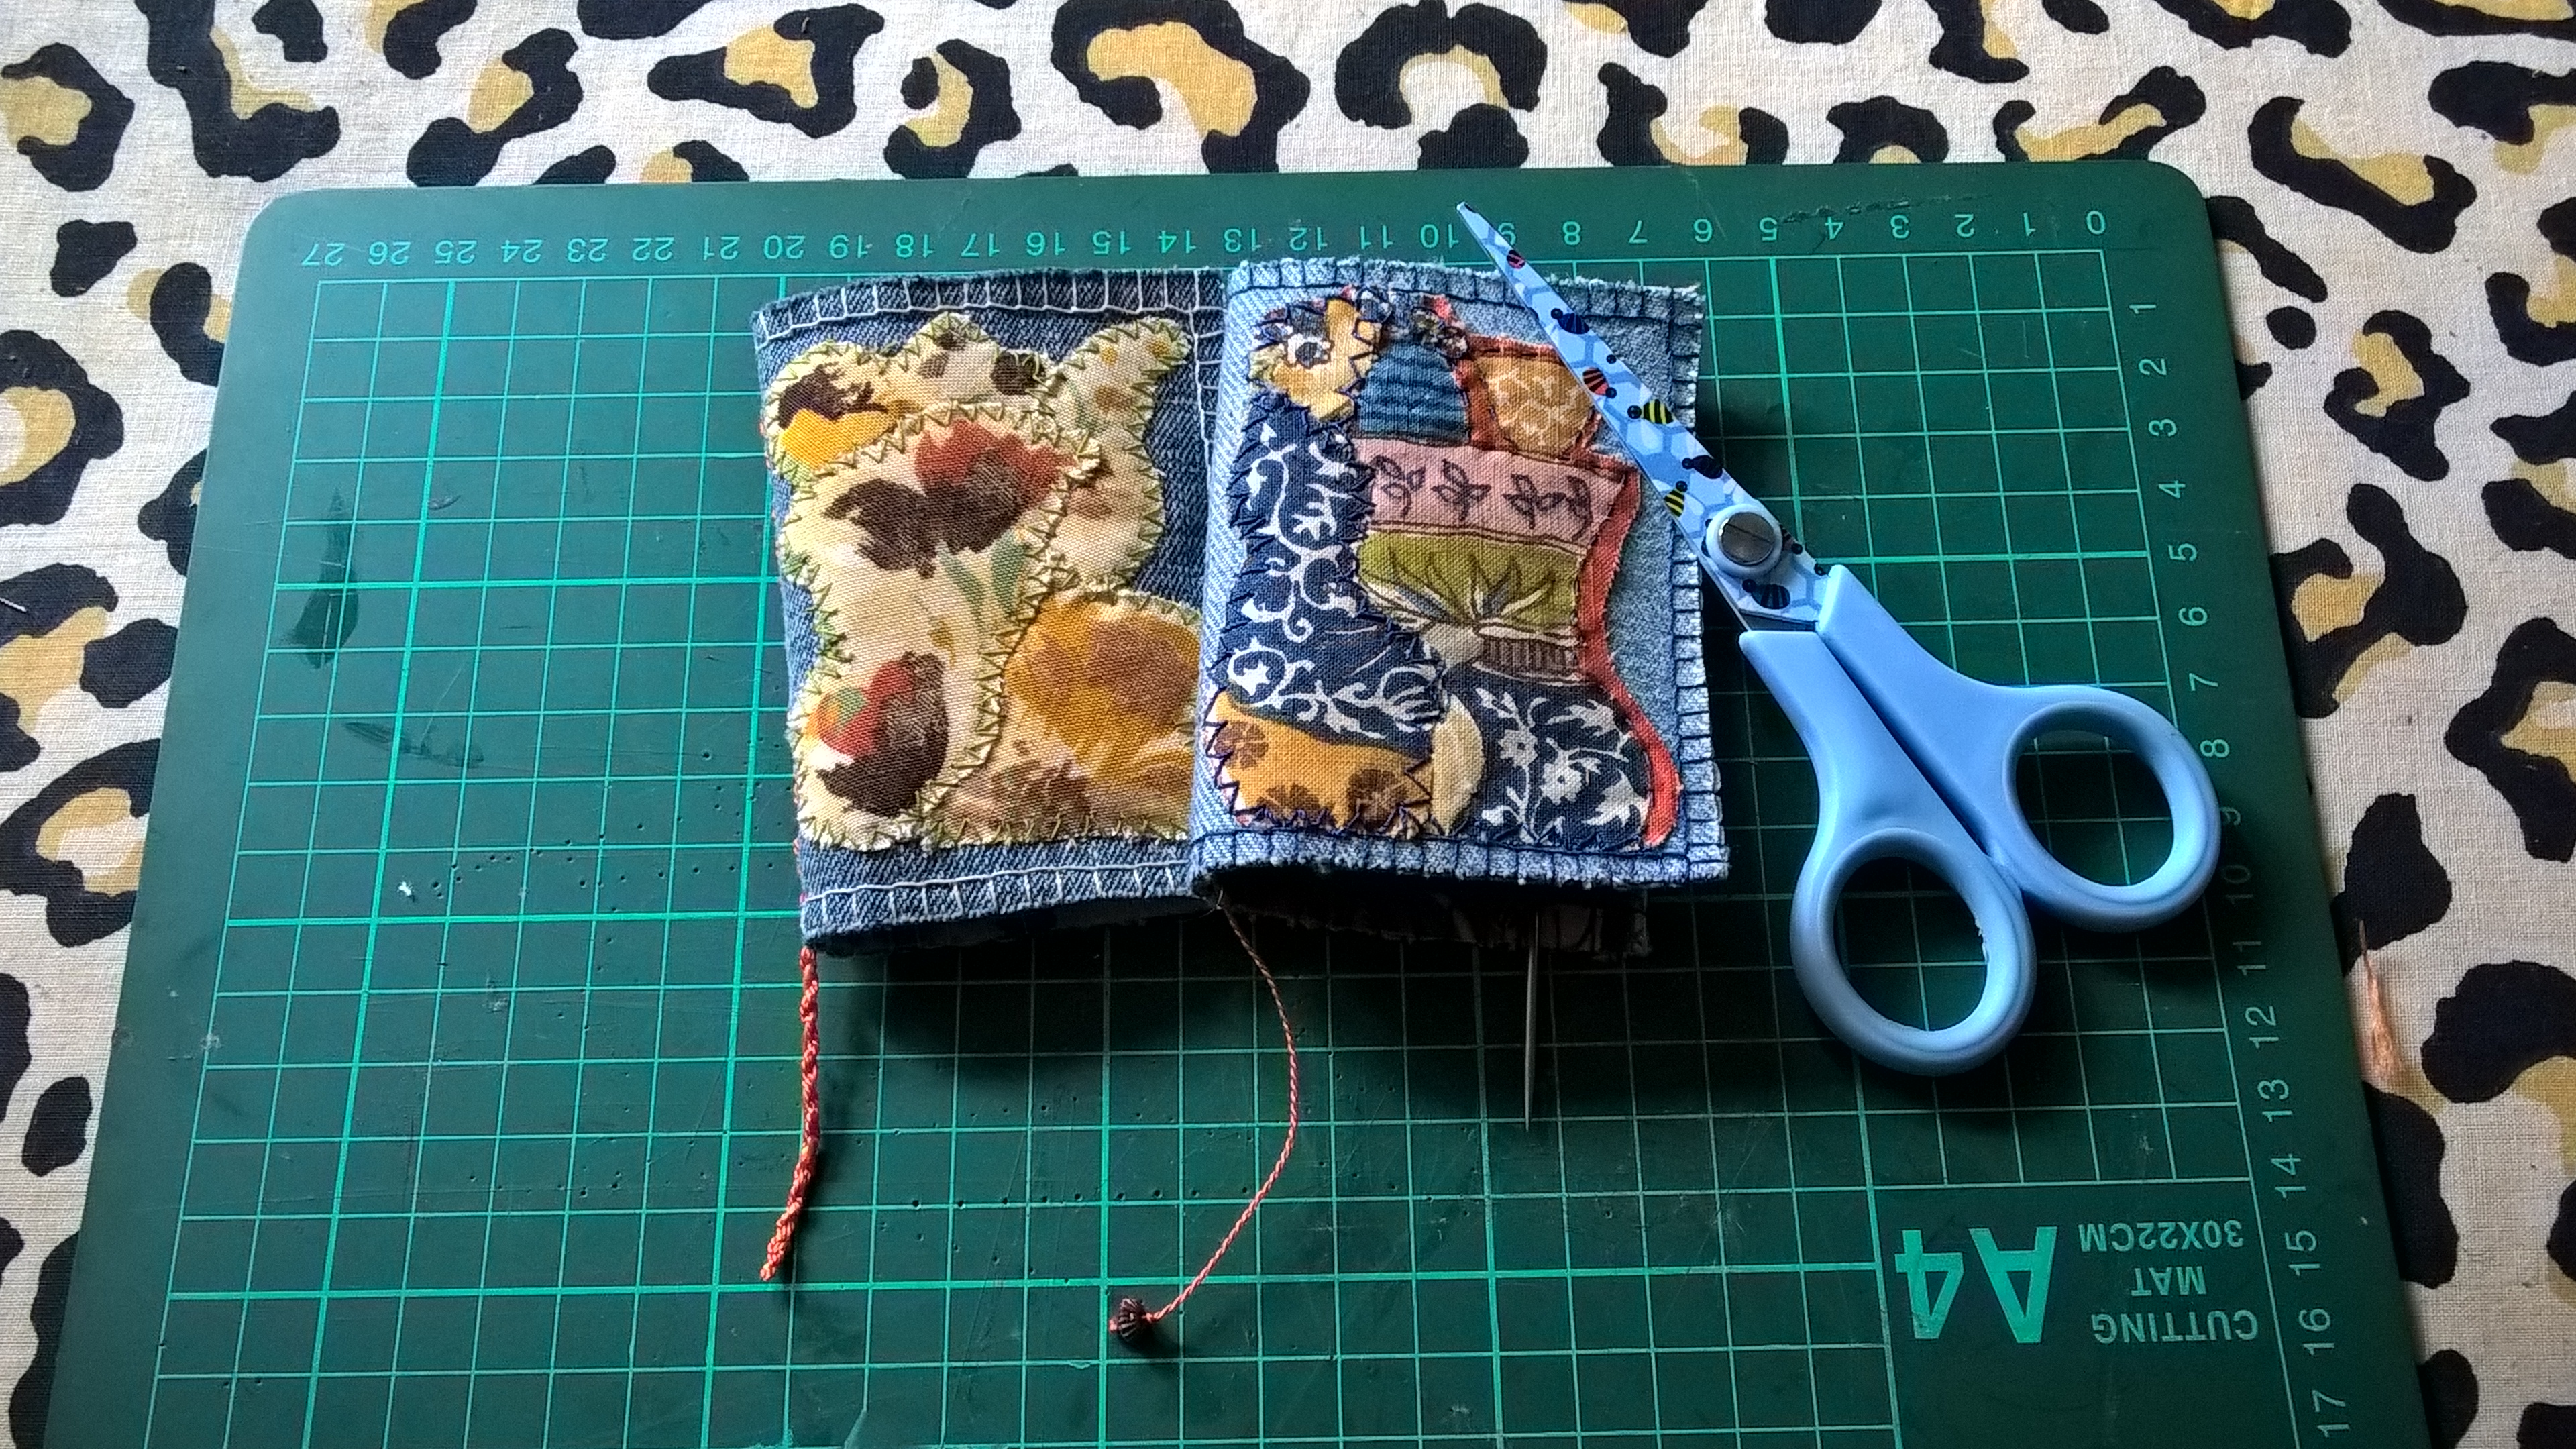
This is the look that we are going for, a denim cover with a blanket stitched edge and a layered applique front.

I use two different fabrics one Indian style and one is more country style, you will see that I wanted the front to reflect the inside.

Materials Required

Fabric scraps – largest size 14cm x 9cm

Iron on Interfacing

Strong Thread – such as top stitching thread/ Decorative threads.

A size 10 Crewel embroidery needle

Scissors/ Rotary Cutter/Awl/Cutting Mat

Ruler and Vanishing Pen

WP_20160614_12_55_12_Pro

Decide what you are going to use, I like to experiment with my husbands old denim jeans as I love the texture and fade of denim. I used leather on the inside as it doesn’t fray, my local scrapstore has a box full of leather in loads of colours. If you are going to use other fabrics for your inserts then the edges will need to be cut with Pinking Shears so they don’t fray. Any stitches that you don’t know how to do can easily be found by searching the net – I teach myself loads of new things this way!

First measure out your pieces for the cover and lining, I did mine at 14cm x 9cm. If you have a large print on your fabric then see if you can capture a good section before you cut, so you don’t have a lining with a random half flower on the inside!

WP_20160614_13_57_01_Pro

Cut out your interfacing so that it is the same size as the cover pieces. I have put the interfacing on both pieces of fabric as they are prone to fraying. Remember to iron them on the wrong side of the fabric!

Next, cut out the shapes you want to use on the front of your cover, you can stitch them on now and then cover the stitches with the lining. I did mine later on as I just caught the stitches through the denim. After that, pin the lining to the cover, wrong sides together and Blanket Stitch all the way round the edge.

Try and get your inserts to have a nice colour blend with your lining, or if you have bright colours go for a clash! Cut the inserts 2cm smaller all the way round. So, the largest one is 12cm x 7cm and the smallest one is 10cm x 5cm.

I punched the holes 0.5cm apart with the Awl on a cutting mat (mine is really old, you can use soft wood such as cork for a surface). Make sure the holes line up on both pieces of leather. Use your vanishing pen to make a mark on the fabric where the centre of the case is, make an anchoring stitch that will be hidden under the edge of the large piece of leather and start sewing the leather pieces to the outer case. Use Double running stitch and the Crewel Needle.

As you can see, I layered on my applique pieces after I blanket stitched the edge. This is so I knew it would fit into the space.  I attached the applique with a hand sewn Zig -Zag style stitch as the edge is quite fragile. In the photo on the right you can see the double running stitch down the spine of the needlecase.

I decided to attach a tail to the needlecase, I used a bit of retro crochet yarn I bought in a charity shop. I wove the yarn through the straight stitch down both sides, leaving a long end which I twisted up and anchored so the twist won’t undo itself. You can see in the photo below I used a single piece of yarn and finished it with a  bead at the bottom.

WP_20160615_12_50_53_Pro

That’s it!


Save

Save